Tuesday, September 28, 2010

Eye Candy

Just a few collections of pretty things!  Enjoy!

Get Real with Teal
Curator: BlueJane @ http://www.artfire.com/users/bluejane 


Mood Rings...A Ring for Your every Mood
Curator:  EntwinedVines @ http://www.artfire.com/users/EntwinedVines 


Ring-Around The...
Curator: StephanieRonnyeknit1bead2 @  http://www.artfire.com/users/StephanieRonnyeknit1bead2

A Splash of Citrus


Welcome Fall

Monday, September 27, 2010

Crustless Pumpkin Pie

Since the time I was very young, my favorite pie has always been pumpkin.  The only thing is, I really only love the pumpkin filling and not the crust.  I remember in my younger years eating only the filling and leaving the crust sitting on my plate, and then asking for seconds.  Sometimes I got lucky and was given another piece! :)

I was craving pumpkin pie and decided that I was going to try to make one crustless - why not?!  So I mixed up the filling, poured it evenly into 4 custard dishes, and baked them.  They turned out perfectly!!!  Since my husband likes crust, I decided to cut out heart shapes from pie crust using my cookie cutters and baking them as if they were cookies.  They too turned out great!

Before serving I topped each dessert with whipped cream, and added the pie crust hearts.  Oh so yummy!!!

Crustless Pumpkin Pie recipe 

1 can (15 oz) pumpkin
1 can (12 oz) evaporate milk
2 eggs
3/4 cups sugar
1Tbsp flour
1/2 tsp salt
1/2 tsp cinnamon
1/4 tsp ground ginger
1/4 tsp ground nutmeg
1/8 tsp ground cloves

Preheat oven to 450 degrees.  Blend all ingredients and pour evenly into 4 custard cups.  Bake 20 minutes.  Reduce temperature to 350 degrees and bake another 40 minutes or until knife inserted comes out clean.  Cool. 


                                                                            ENJOY!

Tuesday, September 21, 2010

We miss you Kirby

It has been one month today since Kirby left us for the green lawns of Heaven.  We still miss him so much and I get instant tears in my eyes when I think of him.  He was such a good dog and friend to our family and he loved us unconditionally as we loved him.


This is Kirby with his Christmas (2009) presents

Kirby was the last dog to pass away in my circle of friends.  All of our dogs were around the same age and we knew that they would probably pass away around the same time, but it sure was a tough couple of years as each one left us.

I had a wonderful dream a few nights ago.  I was standing off in the distance watching as Kirby, Tasha, little Max, big Max, and Muffy were all standing on a big hill.  They were having so much fun together running, playing, and jumping. 

Behind them, lined up watching, were our new dogs; Spicer, King, and Duke with their tales just a wagging!

I woke up from the dream feeling at peace.  I now know that Kirby is doing just fine and that he is feeling young again and is able to run and play like he used to.

I want to share with you a necklace that I had custom made for me the week that Kirby left us.  I bought it from http://www.etsy.com/shop/charmiesonline .  She custom stamps metal and makes necklaces, coins, etc.  I love this necklace and have worn it every single day since I received it. 


Monday, September 20, 2010

Organizing the trash before it becomes treasure

If you call yourself an upcycler, revamper, reclaimer, recycler, or junker, you probably have ran into the problem of what to do with all of the stuff that you have accumulated!  That is the problem that I have run into with my vintage jewelry. 
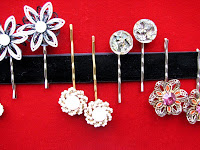
I have tons of (and always on the look out for more!)  broken vintage jewelry, vintage earrings that no longer have their mate, and LOTS of vintage pieces that are missing a rhinestone or two.....all of which is just waiting their turn to be made into something for today fashion diva!

So far I have been storing it all in cigar boxes, plastic boxes, baskets, etc but it is just not working for me.  It's hard to find what I am looking for and by the time I do find just the right piece, I forgot what I wanted it for!
NO MORE!  I have decided to take those plastic organizers that they make for garages to hold nails, bolts, etc and use them to sort out my jewelry.  It is going to take a lot of time (and patience on my part) but I think it will be worth it once it's done.  I can label each drawer with what is inside and even by color! 
I am hoping that by being more organized I will be able to turn trash into treasure more easily!
What are your tips for organizing your supplies?  I'd love to hear about them!

Sunday, September 19, 2010

A SWEET birthday gift

My Niece turned 17 yesterday and today is her party. Like most teens she prefers MONEY so that is what we will be giving her. I still think it's fun if they have something small to open as well. So I decided to make her some Gourmet Chocolate Chip Cookies!

It was about a year ago when I did a search on the Internet for cookies and came across this recipe on allrecipes.com. I have to say that these are by far the best chocolate chip cookies I've ever tasted! Very moist, gooey, and oh so good!

Gourmet Chocolate Chip Cookie Recipe

Makes 15 cookie

2 cups flour
1/2 tsp baking soda
1/2 tsp salt
3/4 cup melted butter
1 cup brown sugar
1/2 cup white sugar
1 Tbls vanilla
1 egg
1 egg yolk
2 cups chocolate chips

Blend flour, baking soda, and salt - set aside.
Mix melted butter, brown sugar, and white sugar. Beat in vanilla and eggs until creamy. Mix in flour mixture. Stir in chocolate chips by hand. Refrigerate for 1 hour.
Preheat your oven to 325 degrees. Grease your cookie sheets or use baking paper (I love baking paper!). Roll 1/4 cup dough into balls and place on cookie sheet 2 inches apart. Bake for 15 - 17 minutes just until outside of cookie gets done. Cool on baking sheets for a few minutes before transferring to a cooling rack.


See how gooey and chewy they are!


I like to stack 5 of them and place into a clear food grade bag. I tie the bag shut with a pretty ribbon. Then I put them into a box and wrap them with pretty paper. Who wouldn't love to get these for a birthday treat?!


Saturday, September 18, 2010

Craft Fairs

In November I will be participating in my very first craft fair. To say that I am nervous would be an understatement for sure! Thankfully I will be sharing a booth with a very good friend of mine (it is her first fair also!) and we will have each other to lean on! hee hee
As I started thinking in my head what all I would need to do, I realized that I couldn't just plop my jewelry on the table and hope it looked good. So I started thinking of ways to showcase my jewelry items.

This is what I came up with to showcase my upcycled vintage hair jewelry/bobby pins.

I took a store bought frame that was black and painted it white. I purposely tried to not take too much care when painting it as I wanted it to have a vintage feel with some of the black showing through. Once it was dry, I covered the glass with red velvet and then ran black velvet ribbon down the center. I love how it turned out and I think it's a great way to showcase my hair jewelry!

If you would like to see close ups of my hair jewelry, please visit my Etsy shop or my ArtFire studio - just click on the links in the left hand column.

The following photo's are close-ups. Thanks for visiting my blog and come again!


Thursday, September 16, 2010

Hello and Welcome!

I'm glad you stopped by! This is my first post on my new blog and I hope you check back often as I will be posting several times a week.

I will be blogging about crafting, baking, and "this and that".
Please visit the links to my shops, face book, and twitter that are found in the left hand column.
Homemade Apple Crumble


I want to share with you a recipe for Apple Crumble. It is so easy to make and oh so yummy! A perfect dessert to make for your family during these cool Autumn days and it will fill your house with the sweet scent of cinnamon sugar and apples!

I like to use clear custard cups for my crumble as I think it's a nice touch for everyone to have their own individual dessert - it makes it more special. I purchased mine at Wal-mart but they can be easily found at most stores.


Recipe for Apple Crumble:

Apple pie filling (store bought or hand made canned)
1 cup flour
1/2 cup brown sugar
1/2 cup softened butter
1/4 cup quick oats

Start by spooning apple pie filling into each custard cup to about 2/3rds full. Next, combine flour, brown sugar, softened butter, and the quick oats until crumbly. Spoon this mixture onto the pie filling, making a nice rounded top. Place custard cups onto a cookie sheet to catch any spills while baking. Bake @ 350 degrees until brown and bubbly.
Great on it's own but even better when served with ice cream or cool whip! ENJOY!


Recipe for home made canned apple pie filling

1 grocery sackful of apples, peeled, cored and sliced
10 cups water
5 cups white sugar
1 cup cornstarch
5 tsp cinnamon
2 Tbls lemon juice

Wash and scald quart jars (or let your dishwasher do it for you!). Fill jars full of apples. Combine syrup ingredients and bring to a boil. Pour syrup to top of jars. Seal and process for 20 minutes in a hot water bath.

***1 quart makes 1 pie***